June 21, 2021
I previously deployed an ML inference on AWS via the Serverless framework and at the time I was using a scikit-learn model with a couple standard libraries [ pandas, numpy, scipy ]. Serverless can strip and compress the dependencies into a nice package for S3 which are later pulled into our Lambda function. However, after transitioning to a Tensorflow model I almost immediately encountered Lambda's max upload package size of 250MB. The Serverless config file has several options to reduce the overall package size, but with the Tensorflow package clocking in North of 1GB, no amount of compression or stripping was going to bring it within Lambda's limits. Alternatively, AWS allows for an Elastic File Storage [ EFS ] to be mounted as a volume in our Lambda function, which would allow for more than enough space for all our dependecies.
UPDATE
While this method is completely feasible and may be a good fit in some use cases, it's still not an ideal solution. In particular, when you need to update/manage any of your dependencies the process becomes clumsy and time-consuming. AWS now allows for deployment of Lambdas within a custom Docker image of up to 10GB, which should generally be more than enough space. A post is forthcoming on this process, but having tried various methods for Lambda deployment, the Docker method is the most manageable and stable - as well as providing all the benefits of Dockerization [ portability, reproducibility ].
Overall our architecture will look as follows:
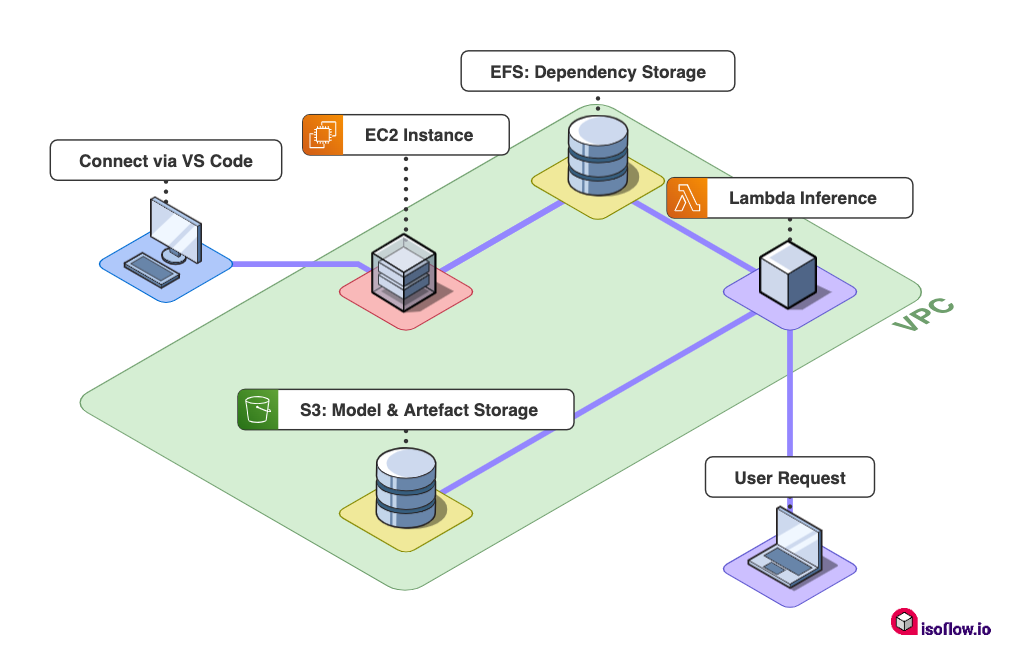 EFS Block Diagram
We'll have to setup and configure a few resources to get this working. In this post we'll go over the following steps:
- Create an Elastic File System
- Configure an EC2 instance for dependency installation
- Making the connection to Lambda and configuring the Serverless function
- A few errors I encountered
# Setting up a VPC
I won't delve into a step-by-step for creating a VPC but will leave a few useful links below for this configuration. Ultimately, we need to provision the following resources:
- Security Group
- VPC within this Security Group
- Both private and public subnets within this VPC
- NAT Gateway
# Creating a volume with EFS [Elastic File System]
- Select EFS from AWS Services menu and Create file system
- You can enter a name for the volume and select the VPC created earlier
- Select Customize:
- File System Settings: I maintain the default values, depending on use-case you may need to check the throughput mode
- Network Access: default values should be setup with subnets and security group defined in selected VPC
- File System Policy: up to you, I leave as default
- Select Create
- Next we want to create an Access Point to mount the volume in our EC2 instance:
- In Amazon EFS > File Systems > Select the EFS created
- Select Access Points > Select Create access point
- Root Directory Path > /ml/dep [ you will need this path later ].
- POSIX User:
- User ID: 1001
- Group ID: 1001
- Root directory creation permissions:
- Owner User ID: 1001
- Owner Group ID: 1001
- POSIX Permissions: 0755
- Select Create Access Point
Once the Access Point is setup we can note down the Access point ID which we will need later. We've configured the permissions so we can assign ownership of the entire dependency folder to this user.
# Setting up an EC2 instance
We will use an EC2 instance to install our dependencies needed for the project. Once our instance is up and running we can connect to it remotely from VS Code and setup our Python environment. Creating the instance is fairly straight-forward starting from our AWS EC2 dashboard:
- EC2 Dashboard > Select Launch instance
- Step 1 > Choose an AMI: Amazon Linux 2 AMI 64-bit [ x86 ]
- Step 2 > Choose an Instance Type: Type t2.micro
- You want to select "Next: Configure Instance Details"
- Step 3 > Configure Instance Details:
- Network: attach the VPC that was setup earlier
- Subnet: select the public subnet created in the VPC
- Auto-assign Public IP: Use subnet setting [ Enable ]
- File Systems: add the EFS created from the dropdown, you can leave the default path "/mnt/efs/fs1"
- You can skip over "Add Storage" and "Add tags"
- Step 6 > Configure Security Group: select the Security Group created earlier
- Step 7 > Review: when you launch the instance you can use existing keys, otherwise create new keys and download the .pem file
The instance should start up and once it's running we can connect to it...so let's do that now.
# Connect to EC2 in VS Code via Remote SSH
We will use the "Remote - SSH" plugin to make our connection to EC2. Install that plugin if needed, bring up VScode's palette and search for "Remote - SSH: open SSH configuration file". On a Mac you will find this file under /Users/whoami/.ssh/config. This is where we can add our SSH connections details for the EC2 instance; the file will look something like this:
# /Users/whoami/.ssh/config
Host ml_dependencies
  HostName ec2-1-111-11-111.us-east-1.compute.amazonaws.com
  User ec2-user
  IdentityFile ~/aws/ec2_keys.pem
First, we've added a name for our configuration ml_dependencies. Next we require a HostName and User - we can locate these from our EC2 Dashboard, select Instance ID > Connect > SSH client and you will find the instances' public DNS. And finally we provide the path to our .pem file which we downloaded earlier. You may have to change the permissions on the pem file otherwise it won't allow the connection:
# terminal
chmod 400 ~/aws/ec2_keys.pem
Once that configuration file is saved, we're setup to connect to the instance. From the palette search for "Remote SSH: Connect to Host" and select the connection just created. A new window should open up for us and let us know the connection has been made. Now we can open a terminal and we should see our EC2 command line.
# Install dependencies
As a first step we'll want to have Python3 installed. Of course we can install from scratch if you require a specific version, or conveniently, we can utilize the AWS Extras Library which has Python 3.8:
# terminal
# Let's check if the extras library is installed - If it is installed we'll see the path to the package
which amazon-linux-extras
>> /usr/bin/amazon-linux-extras

# If it is not installed we can install it
sudo yum install -y amazon-linux-extras

# now let's confirm the python3.8 package is available
amazon-linux-extras | grep -i python
>> 44 python3.8 available [ =stable ]

# enable the repo and install python 3.8
sudo amazon-linux-extras enable python3.8
sudo yum install python3.8
We've installed Python 3.8 but if we check the default version, we'll likely see this:
# terminal
python -V
>> Python 2.7.18
So let's update that with the update-alternatives command (Note: I found I had to include a priority for this to work, in this case I set it to 99 more info):
# terminal
sudo update-alternatives --install /usr/bin/python python /usr/bin/python3.8 99
python -V
>> Python 3.8.5
Now let's install our package manager pip into our root folder (Note: I've installed as the root user not the default ec2-user):
# terminal
cd /
sudo su
sudo curl -O https://bootstrap.pypa.io/get-pip.py
python get-pip.py

# we try to verify installation
pip --version
>> bash: pip: command not found

export PATH=$PATH:/usr/local/bin

# let's try that again
pip --version
>> pip 22.0.3 from /usr/local/lib/python3.8/site-packages/pip (python 3.8)
In the above code I've downloaded and executed the installation script; however, the install isn't included in our $PATH, so we have to manually add it in. At this point we have the environment setup. Now we want to move into the EFS which is mounted at the path we specified earlier and we can install our dependencies:
# terminal
cd /mnt/efs/fs1
mkdir ml && cd ml
touch requirements.txt
nano requirements.txt

# add in your package list and save file
pip install -t ./dep -r requirements.txt --no-cache-dir --upgrade
I've created a folder called ml, moved into that folder and created a requirements.txt file where we can copy/paste in our package list and save. Pip can now install these dependencies to a folder I've called dep. I've used the --no-cache-dir flag to avoid a memory error issue on execution. Ideally, we still want our dependencies to be as small as possible to make the mount in our Lambda as quick as possible. We can trim some fat from our deps folder:
# terminal
## let's get the current size of the dependency folder
sudo du -sh dep
>> 1.5G    dep/

## now let's trim the fat
find ./dep -name "tests" | xargs rm -rf
find ./dep -name "*.pyc" -delete
find ./dep -name "*.so" | xargs strip

## and we get a warm, fuzzy feeling when we check the size again
sudo du -sh dep
>> 1.2G
And finally let's give ownership of the whole enchilada to the user we created in the EFS Access Point:
# terminal
sudo chown -R 1001:1001 /mnt/efs/fs1/ml
# Setup Serverless Lambda
Of course, I am using Serverless to deploy my Lambda function. Below is an example of some configuration relevant just to the mounting of the EFS.
custom:
  bucket: mlflow-artifacts-scorchedice
  efsAccessPoint: fsap-03cb029c9e3b887dc
  LocalMountPath: /mnt/efs
  subnetId1: subnet-041664f9124dc54cd
  subnetId2: subnet-01d1a74878643626d
  subnetId3: subnet-0840c055744513d7d
  securityGroup: sg-032c43cbb647b24c2

provider:
  name: aws
  runtime: python3.8
  region: us-east-2
  iam:
    role:
      managedPolicies:
        - 'arn:aws:iam::aws:policy/AmazonElasticFileSystemClientReadWriteAccess'

functions:
  inference:
    handler: handler.entry_point
    timeout: 480
    vpc:
      securityGroupIds:
        - ${self:custom.securityGroup}
      subnetIds:
        - ${self:custom.subnetId1}
        - ${self:custom.subnetId2}
        - ${self:custom.subnetId3}
    environment:
      MNT_DIR: ${self:custom.LocalMountPath}

resources:
  extensions:
    InferenceLambdaFunction:
      Properties:
        FileSystemConfigs:
          - Arn: "arn:aws:elasticfilesystem:${self:provider.region}:#{AWS::AccountId}:access-point/${self:custom.efsAccessPoint}"
            LocalMountPath: "${self:custom.LocalMountPath}"
And in our handler file we need one snippet to finally mount our EFS and access our dependencies:
try:
  import sys
  import os
  sys.path.append(os.environ['MNT_DIR'])
except ImportError:
  pass

import numpy
import tensorflow

def entry_point():
  print('I've mounted an EFS')

return
# Conclusion
A final note that if you are experiencing timeout issues during the lambda execution this is most likely related to your VPC - essentially, the inference does not have correct permissions to access needed resources, so you'll have to step through the VPC configuration. Overcoming Lambdas memory limit is by no means straighforward, however atleast with EFS it gives us an alternative to mounting large dependencies. Once setup everything runs smoothly and you can continue to update your inference via Serverless, and update your dependencies as needed with EC2.